How to set up email on Android
This is a quick step-by-step guide to setting up email on an Android, running Marshmallow (Android 6) or the Lollipop (Android 5) with your Chapeau Chapeau hosted website / email.
You will have received details from us for your email login including passwords, if not please contact us.
Please replace anything that says “yourdomain.com” or “john@yourdomain.com” in the guide below with your website name or email address. For example ours would be: chapeauchapeau.com and info@chapeauchapeaiu.com. Your website may have a different suffix for example .co.uk or .uk.
STEP 1
Android Settings
Firstly, you’ll need to find the ‘Settings’ icon on your Android home screen.
STEP 2
Choose ‘Accounts’
Once you have found the settings icon, scroll down and tap on the ‘Accounts’ option.
STEP 3
Choose ‘Add Account’
You will be presented with a page of account related options. Scroll down to the bottom of this page and tap on the option labelled ‘Add Account’.
STEP 4
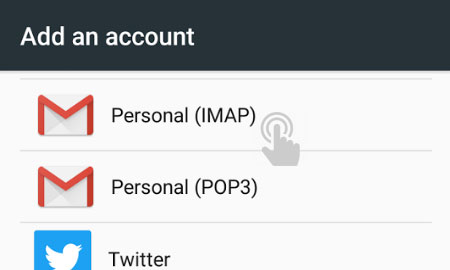
Choose ‘Personal (IMAP)’
You will then be presented with a page of account types. Scroll down to the bottom of this page and tap on the option labelled ‘Personal (IMAP)’.
STEP 5
Enter your email address
Enter your email address into the field provided, making sure that it matches the mailbox from your website. When you have entered the relevant details, tap ‘Next’ to proceed to the next stage.
STEP 6
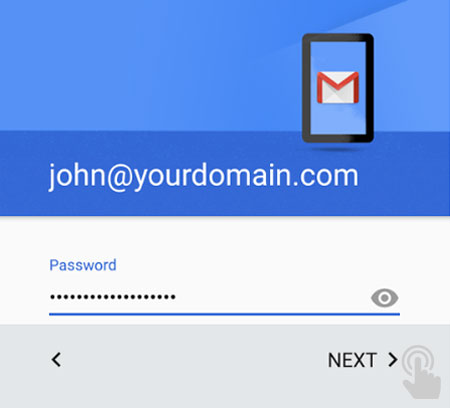
Enter your password
Enter your mailbox password into the field provided, making sure that it matches the mailbox from your website email account. When you have entered the relevant details, tap ‘Next’ to proceed to the next stage.
STEP 7
Incoming server settings
Then enter your incoming mail settings.
If they are not already filled in, enter your email address as the username, and the email address password (as filled in on the previous screen) in the password field.
For incoming mail please enter the server as ‘mail.yourdmain.com’.
In the field labelled ‘Port’ enter ‘993’.
For security type, we recommend leaving this to the pre selected default option. For new Android handsets this will be STARTTLS (accept all certificates), for older it will be SSL/TLS (accept all certificates)
When you have entered the relevant details, tap ‘Next’ to proceed to the next stage.
STEP 8
Validating incoming server settings
Android will then attempt to validate your outgoing mail settings. If your settings do not pass validation, please double check the details you have entered and ensure they match the mailbox from your website.
STEP 9
Outgoing server settings
Then enter your outgoing mail settings.
If they are not already filled in, enter your email address as the username, and the email address password (as filled in on the previous screen) in the password field.
For outgoing mail please enter the server as ‘mail.yourdomain.com’.
For security type, we recommend leaving this to the pre selected default option. For new Android handsets this will be STARTTLS (accept all certificates), for older it will be SSL/TLS (accept all certificates)
When you have entered the relevant details, tap ‘Next’ to proceed to the next stage.
STEP 10
Account Options
Here you will be able to adjust your app settings to suit your needs. We recommend keeping these to the manufacturers default settings.
When you have reviewed the app options, tap ‘Next’ to proceed.
STEP 11
Open your mail app
Finally open your mail app and ensure your details are correct. Then simply tap ‘Next’ to complete the setup.
FINISHED!
You’re ready to roll.
If you are still stuck please just get in touch, we are happy to talk you through set up. We know this technology jargon can be confusing.
Let’s Work Together
Got a project you want to get off the ground, but not sure how to get going? Get in touch with our multi-disciplinary team. We are here to help you creatively and enable you to realise your business potential.


